
Update Sheet Data
When the spreadsheet on your computer changes, you can push those changes into a sheet you already have in InstaCharts instead of importing the file as a new sheet. The sheet stays where it is, so every chart, data table and dashboard built on it keeps working and shows the new data.
Updating a sheet from a file covers three jobs:
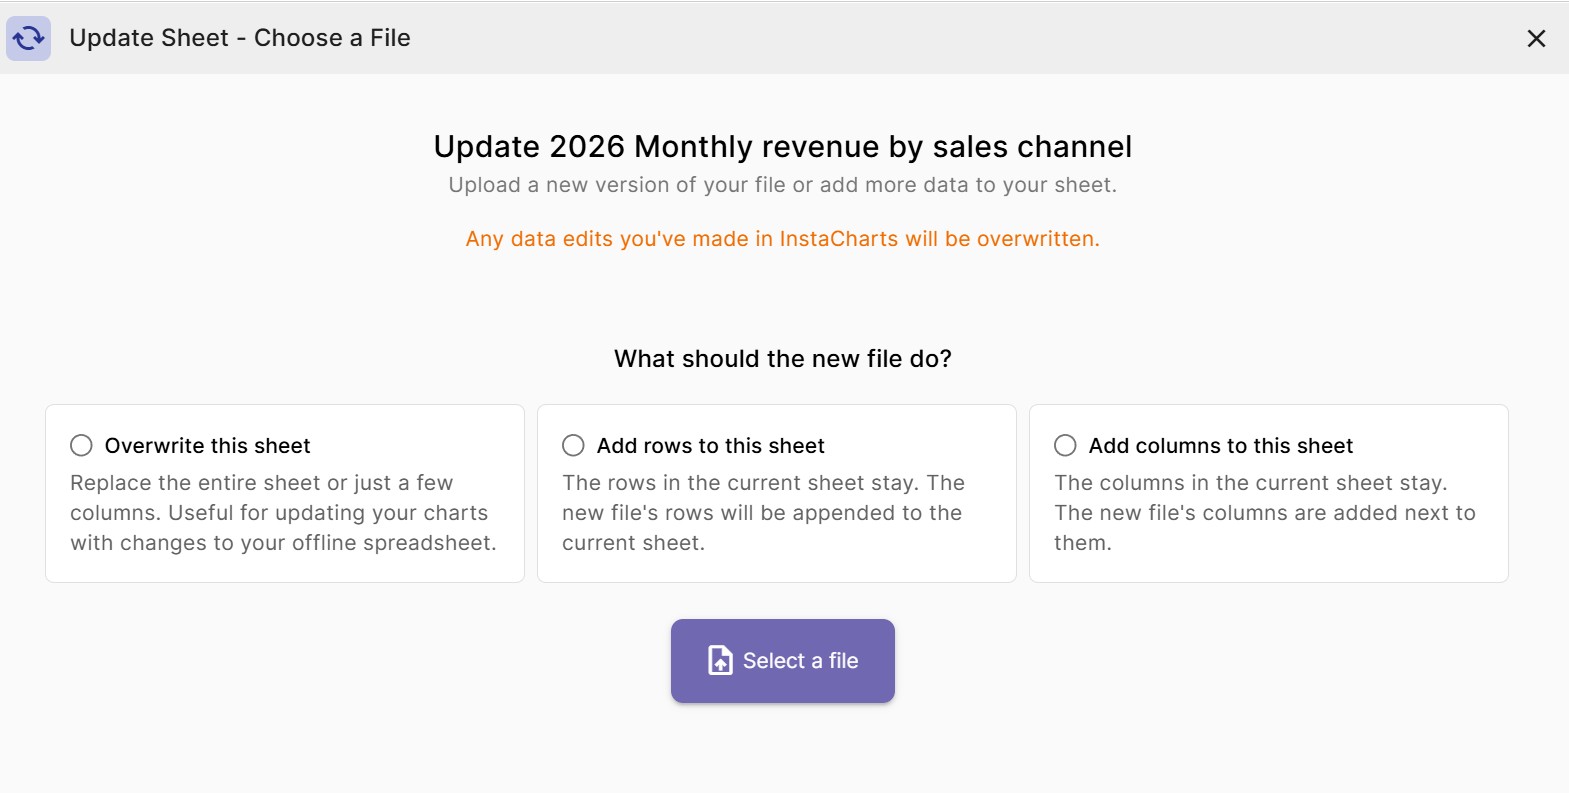
- Overwrite this sheet replaces the data in the sheet with the data in the new file. Use it for a corrected file or a fresh export of the same report (ex: this month’s version of last month’s spreadsheet).
- Add rows to this sheet keeps the rows already in the sheet and appends the rows from the new file after them. Use it for a growing history (ex: a monthly export you want to stack onto the previous months).
- Add columns to this sheet keeps the columns already in the sheet and adds the columns from the new file next to them. Use it when your data gains a measure (ex: a survey that added a question).
Open the Update Sheet Dialog
There are two ways to start an update.
From your workspace, right click a sheet, or open its row menu, and select Update Data.
From inside a sheet, click the sheet name in the main toolbar to open the sheet menu, then select Update Sheet Data.
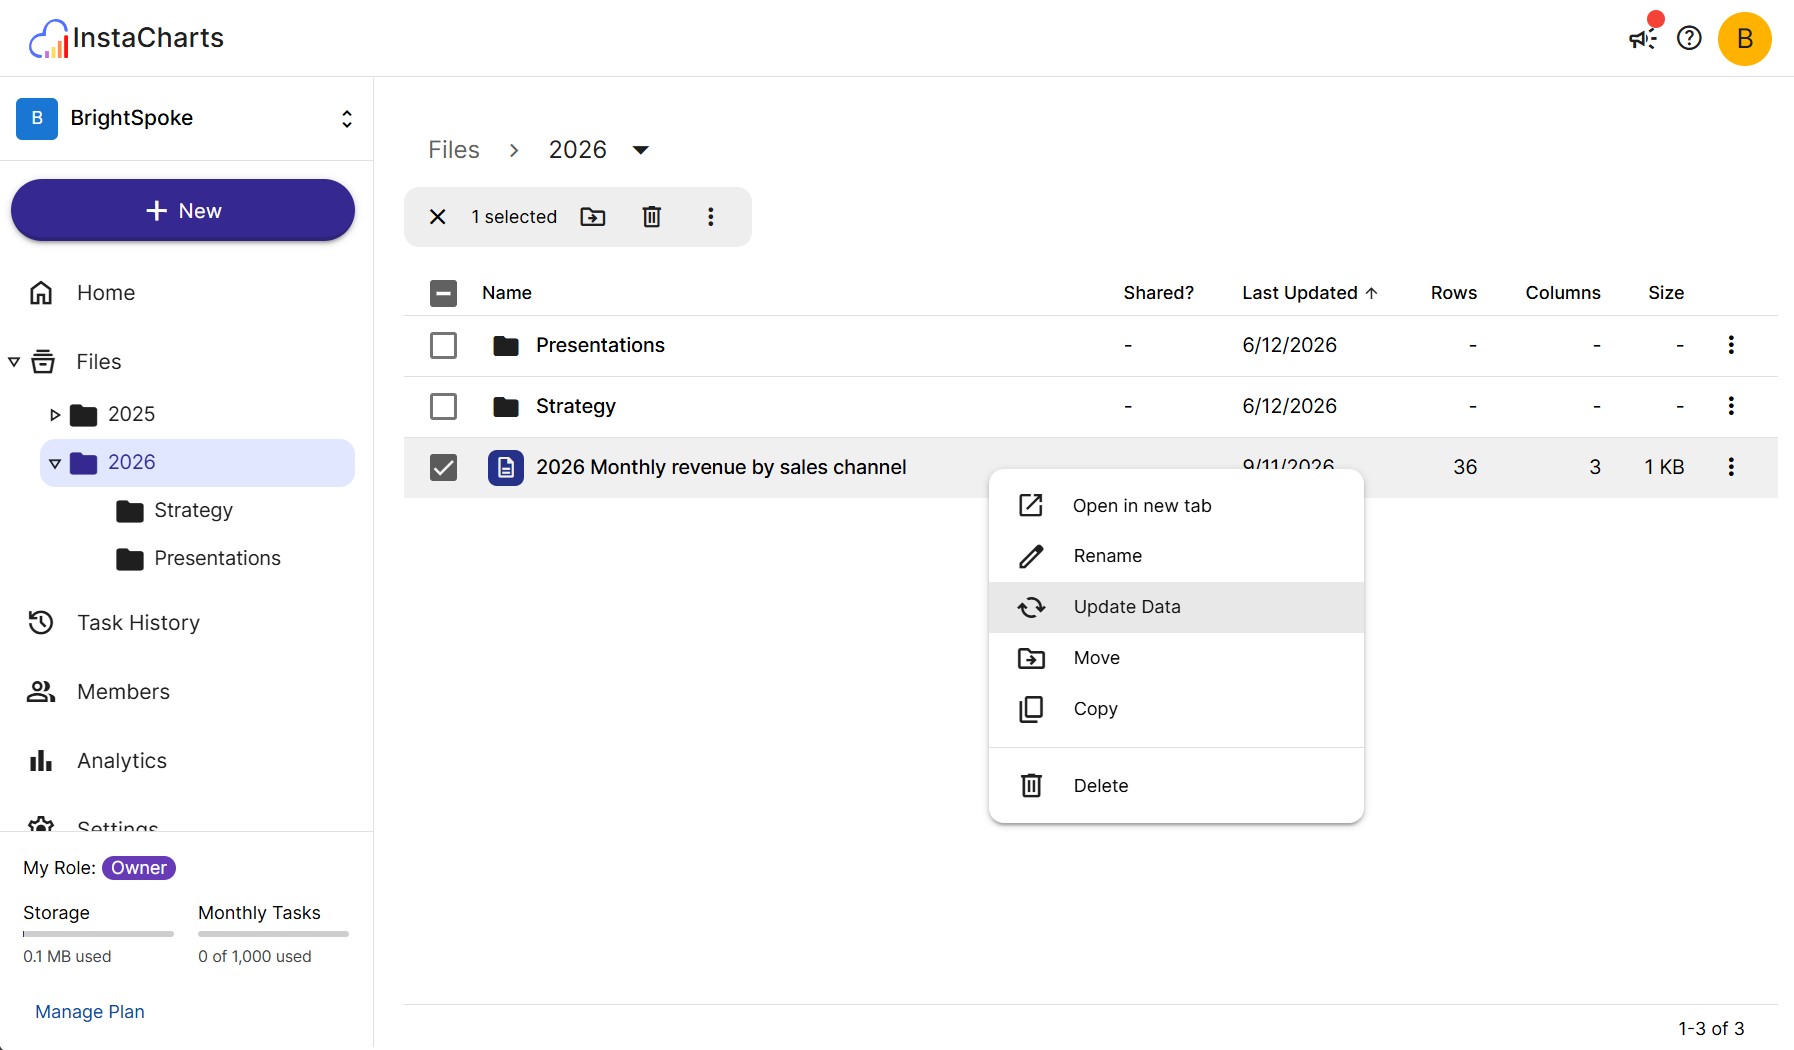
The action is available on sheets that are not already connected to a data source.
Step 1: Choose What the New File Should Do
The first screen asks what the new file should do before it asks for the file. Pick one of the three modes, then click Select a file and choose a spreadsheet from your device.
| Mode | Rows | Columns |
|---|---|---|
| Overwrite this sheet | Replaced by the rows in the new file | Matched to the file, one by one |
| Add rows to this sheet | The file’s rows are appended to the sheet | Matched to the file, one by one |
| Add columns to this sheet | Lined up in order, first row to first row | The file’s columns are added next to your existing ones |
You can update a sheet with any file type InstaCharts imports, including CSV, Excel, TSV, PSV, JSON, JSON Lines, OpenDocument, Apple Numbers and log files. The new file does not have to be the same format the sheet started from (ex: a sheet first imported from a .csv can be updated from an .xlsx). See Import Data from File for the full list of supported formats.
Step 2: Choose the Data to Import
InstaCharts parses the file in your browser and shows the same preview used when importing a new sheet, with the import options on the left and a live preview of the data on the right.
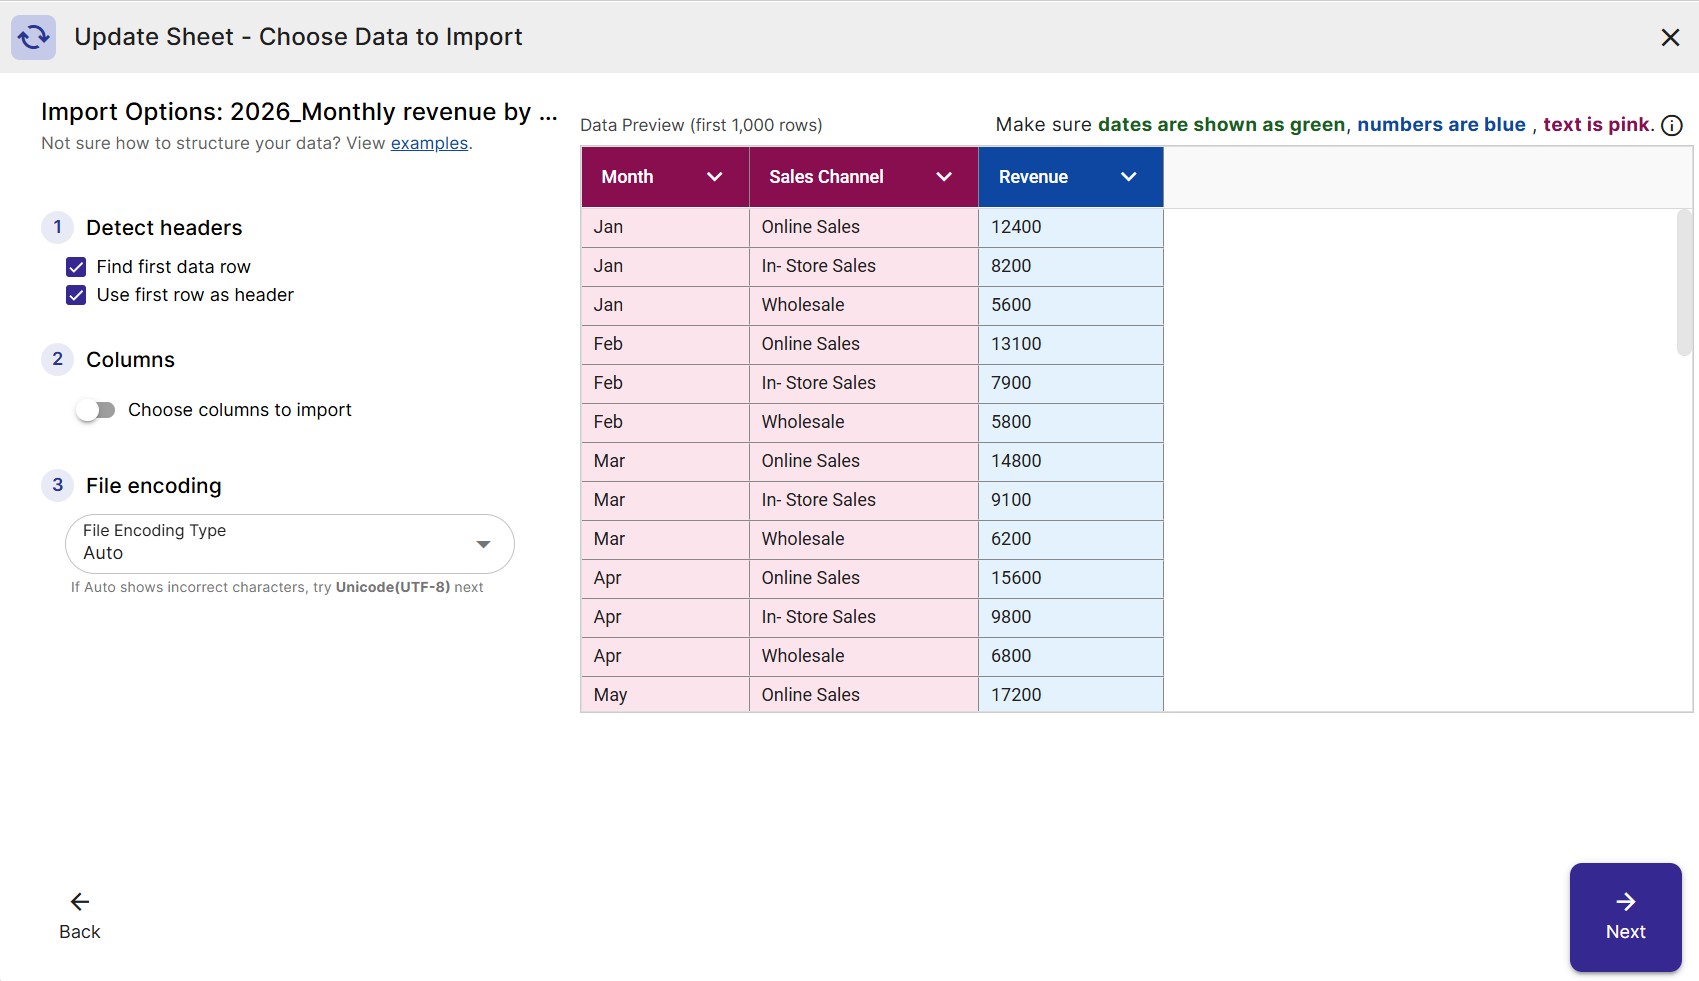
- Pick the workbook page. A workbook with several pages lists them here, and one page updates the sheet. InstaCharts scores the pages against your sheet’s columns and starts you on the page that matches best.
- Choose the columns. Every column in the file is used by default. Turn on Choose columns to import to bring in a subset, which is how you update only part of a sheet.
- Check the header and encoding options if the preview does not look right. These work the same way they do on a new import; see Import Options.
- Click Next to move on to matching.
Step 3: Match Your Data
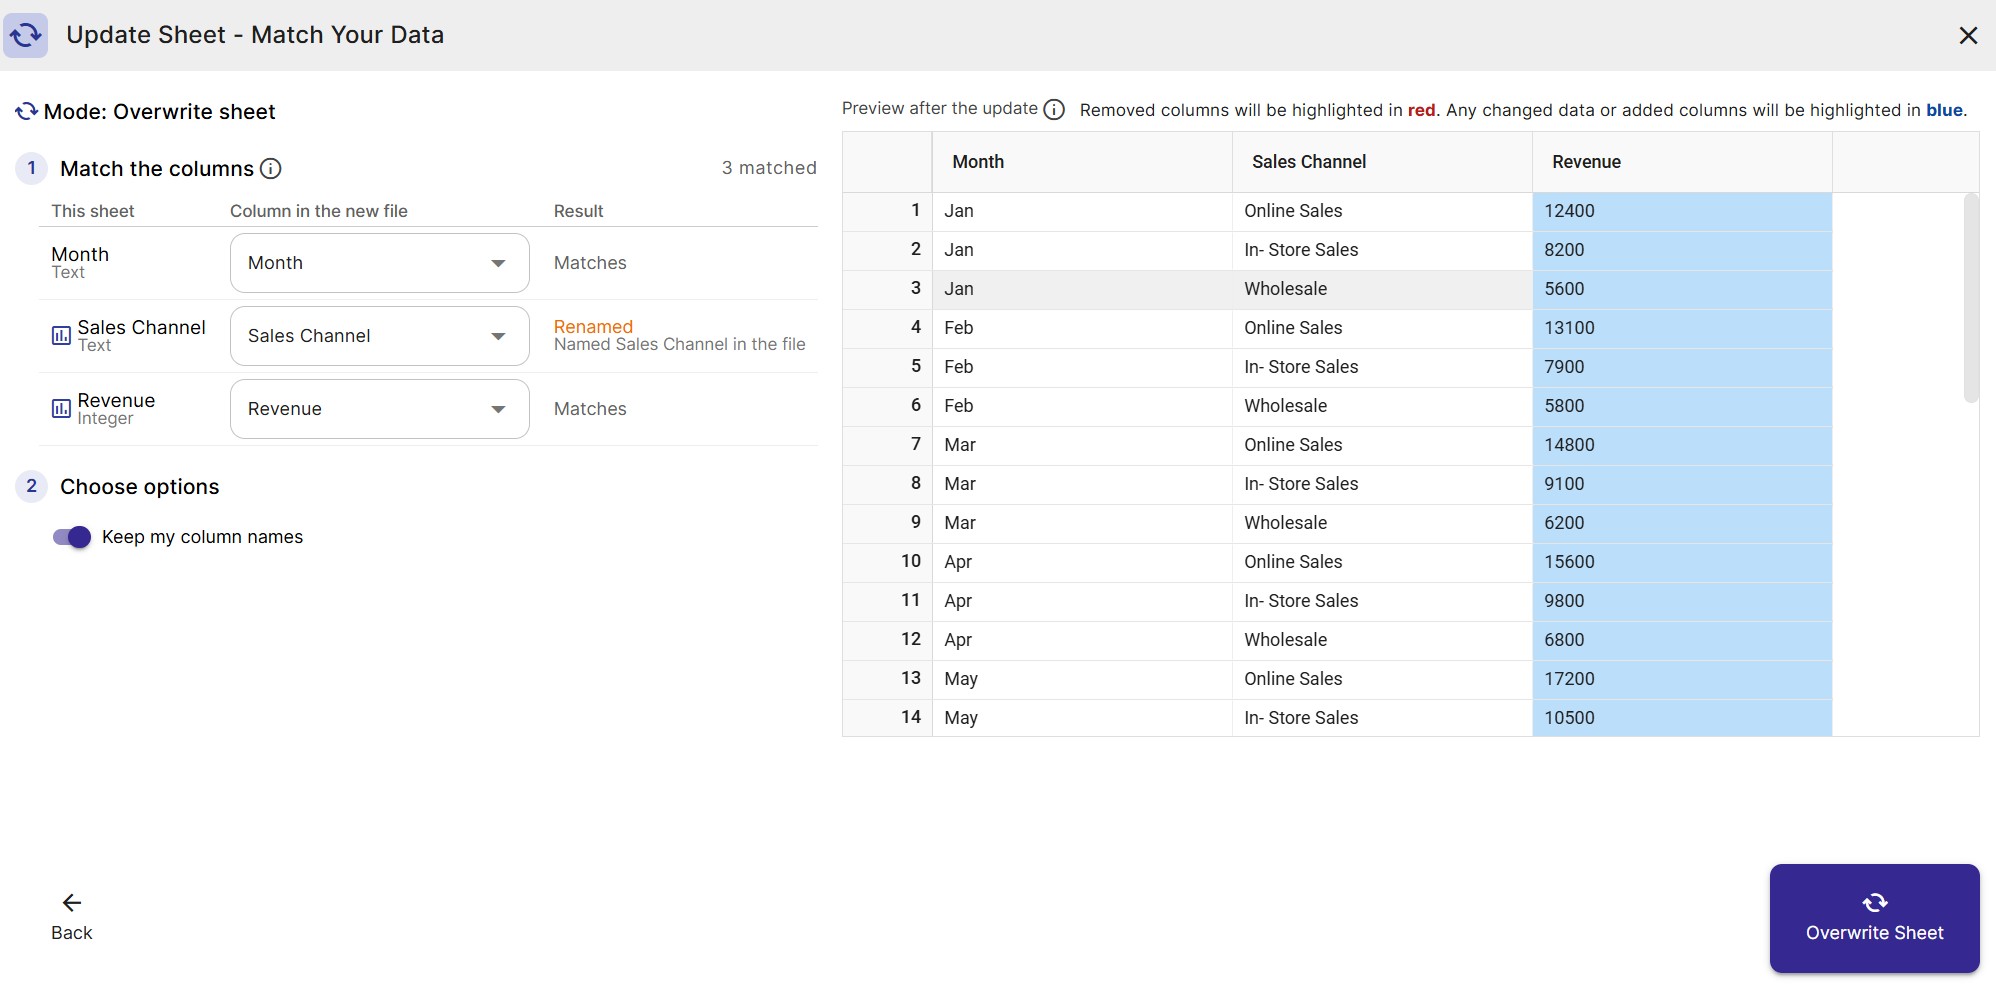
The last screen shows how the new file lines up against the sheet, with the column by column match on the left and a preview of the updated sheet on the right.
How columns are matched
InstaCharts matches your columns automatically: by column name first, then by the column’s position in the file, which is how an unchanged export lines up on its own. Each row of the table shows the column in your sheet, the column it is matched to in the new file, and the result.
To change a match, open the dropdown in the middle column and pick a different column from the file. A file column can only feed one sheet column, so choosing it in one row clears it from any other row. Columns holding the same kind of data as your sheet column are marked with a green check, and a column already used elsewhere is labeled matched elsewhere.
Set a row to Not matched to drop that column from the sheet.
Reading the results column
| Result | What it means |
|---|---|
| Matches | The column lines up with a column in the file and keeps its name and type |
| Renamed | The column is matched, and the file calls it something else |
| Type changes | The column is matched, and the data type changes (ex: Number to Text) |
| New column | A column in the file that is not matched to anything, so it is added to the sheet |
| Dropped | A column in your sheet with no match, so its data is removed |
| Left blank | Adding rows, and the file has nothing for this column, so the new rows are left empty |
| Kept as is | Adding columns, so this existing column is untouched |
| Ignored | Adding rows, and this file column is not going into the sheet |
Columns used by charts
Columns plotted by a chart in the sheet are marked with a chart icon. If one of them would be dropped, the update is blocked and a message names the column, because removing it would break the chart. Match the column to a column in the new file to clear the error.
Everything else about a chart is left alone by the update. A matched column keeps its chart along with the chart’s theme, colors, filters and annotations, and public links and embed codes still point at the same chart.
Preview after the update
The grid on the right shows the sheet as it will look once the update runs, built from the preview rows:
- Blue cells are new or changed from what is in the sheet now.
- Red columns are being dropped, so that data is going away.
Keep my column names
Overwriting a sheet shows a Keep my column names option, turned on by default. It holds on to the column names you already use in InstaCharts, even when the new file names those columns differently. Turn it off to take the column names from the new file.
Row and column limits
If the update would push the sheet past the row or column limit on your plan, a warning appears above the table telling you how much room is left and how much of the file can be added. The extra rows or columns are trimmed during the update. Upgrade your plan to raise the limits.
Run the Update
Click the button at the bottom right; it reads Overwrite Sheet, Add Rows or Add Columns depending on the mode you picked. Your file is uploaded, the sheet is rebuilt, and the sheet reloads with the new data.
Nothing is sent to InstaCharts until you click that button. The file is read in your browser for the preview and the matching, so backing out of the dialog leaves the sheet exactly as it was.
What Is Kept and What Is Replaced
| Kept | Replaced |
|---|---|
| Charts, and their types, axes, colors and themes | The data in the sheet, according to the mode |
| Chart filters, annotations and trend lines | Data edits made inside InstaCharts |
| Public links, embed codes and share settings | Column types, when the new data reads differently |
| Dashboards and the widgets built on the sheet | Column names, unless Keep my column names is on |
| The sheet name and its place in your workspace |
Next Steps
- Import a file as a brand new sheet with Import Data from File
- Keep a sheet current from a live source with Import from Google Sheets and Sync Settings
- Make small changes by hand instead with Edit Data
- Send single rows into a sheet automatically with the Zapier Add Data Row action